Friday, January 31, 2014

Practice Game – April Hall – Daemons of Chaos


Deployment: Battleline

The List
Greater Daemon of Nurgle, Level 4, Lore of Nurgle

Herald of Nurgle, Level 1, Lore of Nurgle, BSB

46 Plaguebearers, full command, banner of swiftness

8 Flesh Houds of Khorne
3 Beasts of Nurgle
3 Beasts of Nurgle

Skill Cannon
Skill Cannon
Soulgrinder, Mark of Nurgle, Phlegm Bombardment


April is a newer player to the Sacramento area.  Not sure how long she has been playing.  I had gone down to the shop to try to get in a 2000 point game for High Elves practice, hoping for 2 games.  I did have a game scheduled but when I got down that guy was playing someone else with another game already queued up, so instead of leaving without a game, I asked April.  April only had a 2500 point list ready, and while she did offer to drop 500 points I told her not to worry about it.  I wasn’t really interested in winning, but in practicing with my army so that when I got to Waaagh!PACA I wouldn’t have to check my book with every rule.  Plus, just dropping 300 points wouldn’t have left her list legal, as she wasn’t offering to rewrite, just drop some of the beasts (and my list doesn’t really care about beasts… now if she had offered to drop a cannon, hehe).  Up 500 points or not, she has a nasty list.  We did agree that because she started with 500 points up front, I would get 500 points at the end.

Magic
For my magic I took the starting Flaming Sword, and as I didn’t roll flame cage with my other roll, took fireball.

April took Plague wind, Miasma, Curse and Rancid on her level 4 and Fleshy Abundance on her level 1.
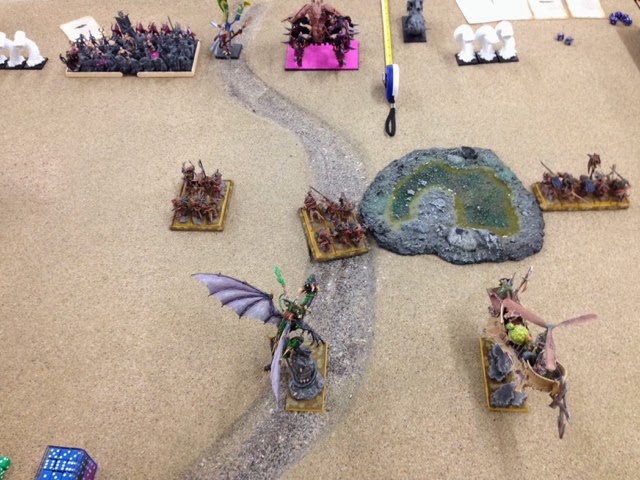


Deployment
April put dogs on her right flank, with the nurgle in the center and one unit of beasts on the right.  I’m surprised by this deployment.  You’ll not the many proxies.  The Tzeentch greater daemon is in fact the Nurgle daemon and the white worm things are beasts.  April put a cannon on each side and her soul grinder on the right-center.

I split my spear only units onto the wings with the other units spread out.  I also split my monsters, with the characters on the right and the phoenix on the left.  In hindsight, I probably should have put the dragon on the other side to gain the protection from the wall.

I vanguarded strong in the hopes that April would take some charges that I could flee.


We rolled and April got the first turn.


Turn 1 – Daemons of Chaos
The daemons did not charge.  April moved up nearly with every unit.  I think the Skill Cannons held still.

April rolled a 5/4 magic phase.  The table kills 1 reaver off the right unit.  I allow a 3D caress on my dragon to lower its stats by 3.  I then dispel a 2D magic missile at a unit of reavers.

In shooting, the cannons go after my dragon, with the first rolling double 1s to wound and the second killing the dragon.  So sad, I spend 20+ hours painting that model and the first game all I got to do was deploy it.  My bad for not putting it behind the wall.  The stone thrower misses.


Turn 1 – High Elves
On my turn I move over the beast units and only manage 1 wound.

I roll a 10/6 magic phase, giving me +1 Ward Save.  I 3D flaming sword on a unit of dark riders, which April allows.  I then 6D the largest fireball at the Greater Daemon for 1 wound and a failed dispel.  In shooting I put 1 wound on the right cannon.


Turn 2 – Daemons of Chaos
Another turn without charges.  For the most part April continues to move up.

A 6/5 magic phase, and the table does nothing.  I allow a 3D miasma for -2T on Phoenix and dispel the magic missile.  The first skill cannon rolls 1 to wound on phoenix and the second takes off the charmed shield.


Turn 2 – High Elves
On my turn 2 and my entire remaining army, besides the dragon mage and the back center unit of reavers charges a skill cannon.

I roll an 8/5 magic phase and get +1S on Phoenixes.  A 3D flaming sword is dispelled and a 5D big fireball puts another wound on the greater daemon.

The one unit doesn’t do anything on shooting.


In combat my general does 2 wounds and the reavers do the last wound to the skill cannon.  The only skill cannon only takes 2 wounds, doing 1 but dies on the leadership roll.


Turn 3 – Daemons of Chaos
Again, no charges for the Daemons (allowing my little wizard to live a little longer!).  April moves up a little inconsistently, I felt, but I’m sure she had a plan.

A 12/6 magic phase has a unit of khorn pop up in my back field in an attempt to pin in my wizard (though they get placed a little close, leaving me an out).  A 6D miasma puts a -1 on a Phoenix and a 6D vortex fails to go off.


The stone thrower misses my wizard.


Turn 3 – High Elves
No charges as I’m fairly out of position, but movement gives me 3 wounds on the hounds, 1 wounds to the beasts and 2 wounds on the horde.

I roll a 9/7 magic phase, 2D flaming sword on a shooting unit and my fireball is dispelled.

Shooting puts 1 wound on the soul grinder (I’ve decided my general is going to kill him, so I wanted to plink off a few wounds even though it meant splitting fire from the greater daemon).


Turn 4 – Daemons of Chaos
Again, no charges as my wizard had ducked behind the khorn unit which prevented everything else from charging.  I give April a few pointers about how she might want to move to pin my wizard down.

April rolls an 8/5 magic phase and the table does nothing.  A 3D curse is allowed on my wizard and I scroll a 5D magic missile at the wizard.


The soulgrinder finally hits and kills the wizard.


Turn 4 – High Elves
My general charges the soulgrinder but doesn’t roll high enough to make it.  My movement does 4 more wounds to the dogs.

No caster and a change in Initiative has no effect on the game.

Shooting puts 2 more wounds onto the Greater Daemon.


Turn 5 – Daemons of Chaos
No charges, but April turns a bunch of her army around.

A 4/2 magic phase lowers her wardsave by 1.  I fail to dispel a 4D magic missile which kills 2 reavers.


The soulgrinder misses.


Turn 5 – High Elves
My general again charges, and this time completes with the soul grinder.  Looking to lower his leadership with static combat, I charge as well with 2 units of reavers, one in the front and one in the flank.  I am hoping to roll some 6s while he only has a 5+ armor and a 6+ ward that he has to reroll.

In my movement I do only 1 more wound to the dogs.

My magic lowers the strength of my Phoenix, poor timing.


In combat, my general only manages to do 1 wound because the soulgrinder is toughness 7 and nurgle.  The Phoenix takes 2 wounds and he passes his leadership test.


Turn 6 – Daemons of Chaos
The greater daemon flanks the unit of reavers.  The horde fails a long charge against a phoenix.

A 6/5 magic phase and the table again does nothing.  A 3D Pestilence lowers my general’s weapons skill and Initiative by 1 (fail to dispel).  He then 3D to lower the toughness on my phoenix/general.

In combat, my general does another wound to the soulgrinder.  The phoenix takes 2 more wounds.  2 reavers die.  I lose and both reaver units run, the greater daemon catching one and then over running to charge my general.  My general rolled to hold.

Turn 6 – High Elves
My last turn and no charges.  I move to kill the dogs.  The magic roll gives my Phoenix +1 Initiative.

In combat, my general challenges to block out the soul grinder.  We all make out ward saves.

Final standing has April with 629 points, 445 from the dragon, 134 from a unit of reavers and 50 from banners.  I scored 450 points from both skill cannons and the unit of dogs, but with the 500 points back from playing down score a win.

This game was sort of a successful test.  Dragon doesn’t get a 2+ ward versus fire, so I needed to be smarter in her placement.  Sucks I didn’t get to play with her at all, she might have fared better against the soul grinder, which was her target long term (hoping to tag team with general, but redirected to cannon when she died).  My expectations that this army isn’t that great seems to bear fruit and I’m glad to be well on my way to having my revised dark elves for adepticon.

Monday, January 27, 2014

WaaaghPACA! – The Main Event – The Missions


General Rules
The Man of Intrigue (MoI):  The man of intrigue is a token model, similar in idea to a crew model on a warmachine.  It’s really just a way of picking a unit at the beginning of the game for some special purpose, and doesn’t itself do anything in the game.  The model itself can be most anything you like, though no larger than a 50mm base can be used.

In a fortitude setting, the unit chosen always generates an additional fortitude equal to the rank bonus of the unit, up to a bonus of +3. NOTE: this rule doesn’t help me, and I’m hoping to use the phoenix to quickly remove this advantage from my opponent.


Controlling Terrain:  There is a note in the rule set about controlling terrain.  It should be noted that none of the missions specifically refer to this rule.  WaaaghPACA! has table specific terrain rules, and I expect that this rule will provide 100 bonus points for holding a specific forest on a specific table and will be very much subject to the randomness of table pairings.  Anyways, terrain can be claimed by having a model touching the terrain with no enemy model also touching the piece.  If the piece is impassible, its “area” is a 3” bubble around the piece.  NOTE: the very fast core will be responsible for this grab late in the game.

Round 1
Deployment: Dawn Attack
In addition, the player who has traveled the farthest decides who pick sides (and who deploys first) and the person who deploys first also decides who goes first.
Man of Intrigue: The chosen core unit does not roll to deploy.
Scenario Points:
                  4 Points – Win by 100 points
                  3 points – Tie (within 100 points)
                  2 Points – Lose by less than 300 points
                  1 point – Lost by more than 300 points
Objective (1 points): Your MoI unit is in your opponent’s deployment zone, without theirs being in your deployment zone.

As I will likely be the farthest, I’m not sure how I’ll choose.  I can see the advantage of letting them move up and no losing a turn with the phoenix.  I suppose this will come down to how many warmachines they have.  I might want to have them start the game with my fast cavalry already dancing behind their deployment and trying to roll 6s to wound warmachines.


Round 2
Deployment: Meeting Engagement
In addition, the youngest player decides who choses table sides (and who deploys first) and the person who deploys first also decides who goes first.
Man of Intrigue: Opponent choses who gets the MoI.  If you have 3 or more core units than they must choose a core unit, otherwise they can choose either core or special.  Opponent also deploys the MoI unit, who does not roll for reserves, must be at least 6” from the table edge and gains vanguard as if fast cavalry (one would imagine to prevent it from being faced the wrong way).
Scenario Points:
                  4 Points – Win by 100 points
                  3 points – Tie (within 100 points)
                  2 Points – Lose by less than 300 points
                  1 point – Lost by more than 300 points
                  0 points – Lost by more than 1,000 points
Objective (1 points): Killing your opponent’s MoI without losing your own.

I’m not worried about the special rules for this mission.  I already have vanguard after all.  I’ll probably just place their unit in the corner, as I’m sure most will, which is why they gave the unit vanguard to undo it.


Round 3
Deployment: Blood and Glory
In addition, the player with the least facial hair deploys first and the game ends should either army reach the breaking point of 2.
Man of Intrigue: Remember the fortitude generation listed above.  A wizard in the MoI unit may enhance a cast or dispel by singing during the roll (enhanced changes all rolls of 1 to 6, which can cause irresistible force, roll twice and apply both results).  Singing must be 15 seconds or more and cannot be used on bound spells.  Should you have no wizard, the MoI’s unit can cast a signature spell from any of the 8 lores as if a level 1 wizard, but must sing to cast it and any irresistible force causes the unit to take d6, S10 its instead of miscasting.
Scenario Points:
                  4 Points – Your opponent’s fortitude was broken
                  3 points – Win by 100 points
                  2 Points – Tie (within 100 points)
                  1 point – Lost by more than 100 points
                  0 points – You were broken
Objective (1 points): Sing exactly three times.

Here is a tough mission for me.  I won’t have a wizard in the MoI unit so I can’t enhance a casting.  Once my wizard dies though I will be able to sing to cast.  The only way I get this bonus point is if my caster dies before turn 4 so that my MoI unit can cast the last three turns.  As my wizard doesn’t deal with fortitude (but does for points), I may be willing to sacrifice him off the top of the dragon (after I’ve used my scroll of course).  I have a breaking point of 7, so I’ll have to be pretty turn before I reach my breaking point… though if they are able to kill my core they only need to do 28 wounds on T3.  Good thing high elves have 30” bows and I already expect them to do nothing.

This is one of those missions where the phoenix will be tasked with nuking the MoI’s unit.


Round 4
Deployment: Battleline
Man of Intrigue: Generates Fortitude per rule above only.
Scenario Points:
                  4 Points – Win by 100 points
                  3 points – Tie (within 100 points)
                  2 Points – Lose by less than 300 points
                  1 point – Lost by more than 300 points
                  0 points – Lost by more than 1,000 points
Objective (1 points): Capture more table quarters by having the most fortitude in the quarter.

This is just a straight up fight, with fortitude counting as they bonus so I’m not that worried.  I can have something in each, so I really only need to block my opponent out of 1 quarter.  Pushing hard and fast will defiantly discourage them from advancing, or at least that has been my experience.  If my opponent does decide to push up, it only makes it easier for me to reach him as I like.

This is one of those missions where the phoenix will be tasked with nuking the MoI’s unit.


Round 5
Deployment: Battleline
Man of Intrigue: Generates Fortitude per rule above only.
Scenario Points:
                  4 Points – Win by 100 points
                  3 points – Tie (within 100 points)
                  2 Points – Lose by less than 300 points
                  1 point – Lost by more than 300 points
                  0 points – Lost by more than 1,000 points
Objective (1 points): Have more fortitude within 12”of the center of the table at the end of the game.

Just like the last mission.  They push in the center, makes it easier for me to reach them with the Phoenix.

This is one of those missions where the phoenix will be tasked with nuking the MoI’s unit.

Saturday, January 25, 2014

Army Photos

Here are some pics from two armies I liked


Some nice converted krox


My friends and I have talked about this list but never built it.


Friday, January 24, 2014

WaaaghPACA! – Warm-Up Event – The Missions

General Rules
The Man of Intrigue (MoI):  The man of intrigue is a token model, similar in idea to a crew model on a warmachine.  It’s really just a way of picking a unit at the beginning of the game for some special purpose, and doesn’t itself do anything in the game.  The model itself can be most anything you like, though no larger than a 50mm base can be used.

In a fortitude setting, the unit chosen always generates an additional fortitude equal to the rank bonus of the unit, up to a bonus of +3. NOTE: this rule doesn’t help me, and I’m hoping to use the phoenix to quickly remove this advantage from my opponent.


Controlling Terrain:  There is a note in the rule set about controlling terrain.  It should be noted that none of the missions specifically refer to this rule.  WaaaghPACA! has table specific terrain rules, and I expect that this rule will provide 100 bonus points for holding a specific forest on a specific table and will be very much subject to the randomness of table pairings.  Anyways, terrain can be claimed by having a model touching the terrain with no enemy model also touching the piece.  If the piece is impassible, its “area” is a 3” bubble around the piece.  NOTE: the very fast core will be responsible for this grab late in the game.

Round 1
Deployment: Battleline
Before the game starts each player marks 3 terrain pieces (face down) with 1, 2 or 4 points.  Slips can be revealed mid-game when you control the piece.
Man of Intrigue: No Additional Rules
Scenario Points: Control the terrain your opponent’s slips are attached to.
Objective (3): Control more points than your opponent.

This should be an easy mission, depending on the terrain.  I don’t have to worry about the survival of a good chunk of my army, needing just 3 units left which are fast enough to be where I need them to be.  They don’t’ even need fortitude.  To counter my opponent I just need to spread out his objectives as far as possible, and then pick off all his small units, forcing him to either pick a section of the field or spread out.  I don’t actually need to deny my opponent points, just 1 terrain piece so that I can get MORE points.


Round 2
Deployment: Battleline
Before the game starts each player may purchase points with fortitude (no MoI Bonus).  Abilities are assigned to your units, but only one per unit (some can be assigned to opponent’s units).  Cannot be given to characters, but characters gain the benefit while in unit.

2 Points
Armor Piercing
Flaming
Swifstride
Frenzy

1 Point
Terror
ITP
Strider (everything)
Sea Creature

Can Give to Opponent
ITP
Sea Creature
Flaming
Frenzy

Man of Intrigue: No Additional Rules
Scenario Points: Earn 2 points for each of the following:
Keeping General Alive
Keeping Highest Point Unit Alive
Killing General
Killing Highest Point Unit
Killing MoI
Objective (-): None

I think this sounds like a really interesting mission.  I think the best way to agree with my opponent is to do it blind.  I write down all my slips, pass them out to my units (while he does his) and then pass out to his as he passes out too mine and then flip them all at once.  Neither my dragon nor my general can be upgraded.

I will have 7 points to spend, and it’s really tempting to just spend 5 of those points giving all of my fast cavalry Terror and hoping that they don’t counter it by giving their army terror or ITP.  Them passing out Sea Creature to my army would really suck, as it would prevent me from marching.  That doesn’t stop me from doing the same thing myself, which might be better than just giving all of my fast cavalry Terror.  If flaming wasn’t 2 points, I would considering giving them flaming to upgrade my ward saves, and might should they have a practically dicey unit.  I don’t need to by swiftstride and won’t bother with frenzy (on either).  I won’t buy either ITP, won’t give myself Flaming or Strider.  I think my short list would be:

For myself
Armor Piercing (2 points)
Terror (1 point)

For them
Flaming (2 points)
Sea Creature (1 point)

With the ability to only give 1 upgrade per unit, I would give armor piercing to my phoenix and terror to my riders.  If they have any dragons, then I will be passing out flaming galore.  Smaller bow fire I probably won’t worry about.  Sea Creature for anything fast that I think could be used to counter my movement, especially as I expect they will be giving me sea creature.  Hehe… making all their cannons flaming when I have 4 fireborn models (phoenix – not rider and dragon mage – not dragon).


Round 3
Deployment: Blood and Glory
Break Point is 0
Man of Intrigue: No Additional Rules
Scenario Points: Earn 2 points for each of the following (cumulative):
Have 5 or more Fortitude left
Your opponent has 4 Fortitude left
Your opponent has 2 Fortitude left
Your opponent has 0 Fortitude left
Kill the MoI unit
Objective (-): None


For this mission I doubt I will be able to pick up the points on either end, but I will probably be able to put the pressure needed to take down the MoI unit.  It will basically be a normal stand up fight, just not worrying so much about getting points off the smaller stuff and won’t have to worry about losing my dragon and phoenix.